Stink Blossom
How to Make Your Own Weed Strain: A Beginner’s Guide to Breeding
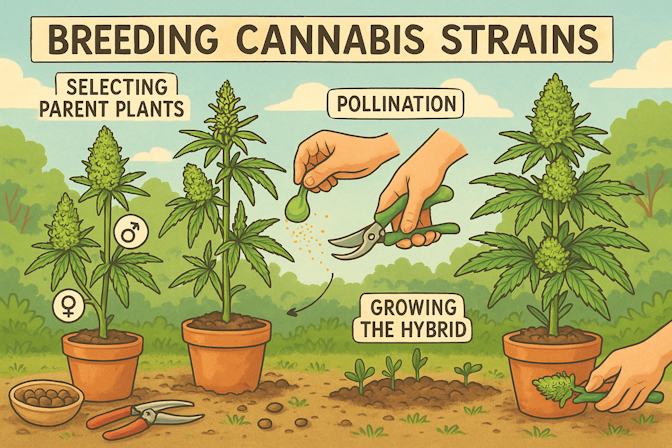
How to breed your own weed strain, step-by-step.
Modern cannabis wouldn’t be what it is today without breeders. They’ve been cross-pollinating plants for generations to create new strains with specific traits like higher potency or unique flavors.
Two main varieties of high-THC cannabis have shaped modern breeding: narrow-leaflet drug-type (NLD) and broad-leaflet drug-type (BLD) plants. NLD varieties are often referred to as “sativa” in cannabis culture, and typically grow taller with slender leaves. BLD varieties, commonly called “indica,” are shorter, bushier plants with broader leaves.
From these plants, breeders began blending the cannabis genetics to create hybrids, whether an NLDxNLD, NLDxBLD, or BLDxBLD cross. In the industry, you may hear people say that every strain is technically a hybrid, and while that’s not entirely true, most strains today were indeed bred using hybrid genetics. Thanks to this work, several legendary strains exist, like Northern Lights, Cheese, Blue Dream, Haze, and more.
Cultivating your own cannabis strain can be quite the task, but if you’re up for the challenge, it can be a fulfilling journey. Let’s cover some breeding basics and dig into how to make your own weed strain.
Understanding Cannabis Breeding Fundamentals

Herb
Breeding cannabis strains has been a staple in the cannabis community to create unique strains. With such a wide genetic variation that exists through cannabis cultivation and breeding today, many cannabis enthusiasts are interested in learning how to make their own weed strain.
The Basic Breeding Goal
At the center of breeding cannabis is combining desired traits from two parent plants to create offspring that consistently express those favorable traits. These traits could include higher potency, unique aromas, resistance to pests, or faster flowering times.
This process starts by selecting parent plants that already exhibit these traits. Once the plants are crossed, breeders evaluate the offspring to select the most promising plants to continue growing and refining. Over multiple generations, the aim is to stabilize these desirable traits so that they reliably appear each time the crop is grown.
Why Parent Strain Selection Matters
Each cannabis plant carries unique genetic traits that influence the offspring, such as flavor profiles, growth patterns like leaf and bud structure, and terpene and cannabinoid content. Selecting the right parent plants for your own marijuana strain is vital for these reasons. A careful selection of specific traits helps to ensure that the desired characteristics are passed on and undesirable ones are minimized.
Depending on your desired genetic makeup, you can choose marijuana plants that are of the same strain or two different weed strains and combine them. The important thing is to choose parent plants with a stable genetic makeup.
Male vs Female Cannabis Plants
The cannabis plant is dioecious. This means that a cannabis plant can either develop male or female reproductive parts. Male plants produce pollen sacs that release pollen, while female plants develop resinous flowers typically harvested and consumed.
For the purpose of breeding cannabis strains, you need both a male and a female plant. But it’s important to separate the two until you’re ready to create your strain, since males release pollen that fertilizes female plants nearby, causing them to produce seeds instead of focusing energy on flower development.
Breeding Techniques
Cannabis breeding is not one size fits all. Many breeders can use different breeding techniques that are unique to their needs and wants during the breeding process.
The most common breeding technique used today is called backcrossing. Backcrossing is done when two parent plants are crossed, and then the offspring is crossed with one of the parent plants.
How To Make Your Own Strain of Weed: Step-by-Step
Herb
Before diving into the process of how to make your own strain of weed, gather the following materials:
- Quality cannabis seeds or clones of the chosen parent plants
- Separate grow spaces or tents for male and female plants, or pollination bags to cover the male plant during pollen release
- Pollination tools (e.g., small brushes, parchment paper, small containers/coin envelopes for pollen collection)
- Storage containers for seeds
- Labeling materials for plant identification
- Environmental controls (lights, fans, humidity monitors)
- Optional: gloves, eye protection, and a mouth/face covering
1. Decide What You Want in Your Strain
Before you start making your own cannabis genetics, get clear about your goals. Do you want a strain that eases chronic pain? A heavy hitter for sleep? Something fruity with high yields? List the traits you’re after: flavor, aroma, effects, flowering time, THC/CBD content, plant structure, pest resistance, etc.
Breeders will often look for two strains that complement each other. For example, you might pair a fast-flowering and mold-resistant strain with one known for its potent effects or unique terpene profile.
2. Select and Prepare Parent Plants
Now it’s time to choose your plant parents for your new strain. Start by sourcing seeds or clones from strains that match the traits you’re aiming for.
The traditional breeding approach uses regular seeds. If using regular seeds, it can be helpful to grow several plants of each strain and observe them during the vegetative stage. After 4-6 weeks, you’ll be able to identify male and female cannabis plants. From there, choose one healthy male and one healthy female plant that express the desired traits you want in your new strain.
Once you’ve selected the healthiest, most promising male and female plants, isolate the male until you’re ready to start breeding to avoid accidental pollination.
3. Pollinate and Create Seeds
Once your female cannabis plant begins to flower, usually around weeks two or three, she’s ready for pollination.
You can collect pollen from a mature male plant by placing a bag over a flowering branch and gently shaking or brushing it off onto a clean surface. For more tips on pollen collection, check out our full guide here.
Lightly dust pollen onto the female lower bud sites using a clean brush or Q-tip. You can target individual buds or an entire branch, depending on how many seeds you want.
After pollination, isolate the marijuana plant from other plants to prevent unwanted cross-pollination. Over the next four to six weeks, she’ll start producing seeds. The calyxes will swell, eventually producing hard, striped seeds—your first generation (F1).
4. Harvest, Store, and Germinate Seeds
You can harvest seeds once the female plant reaches full maturity (around six to eight weeks after pollination). Dry the seeds for a few days in a cool, dry place. Store them in labeled glass jars or coin envelopes in a dark, humidity-controlled environment. Good seeds will remain viable for years if stored properly.
When ready, germinate seeds using your preferred method: paper towel, water soak, or directly in soil.

Herb
5. Grow Out the Seeds (First Generation)
Plant several of your new F1 seeds. This step is about seeing what traits express themselves in the offspring. Some plants might lean more toward one parent, while others might be more of a blended mix. It is recommended that you take detailed notes on each phenotype’s growth habits, aromas, resistance, yield, and potency.
Be prepared for a wide range of phenotypes; this is where you’ll start selecting what traits you like the most for the next future generations. Remember to label the phenotypes, e.g., Trop Cherry #1, #2, #3, etc., so you can properly keep track of which is which.
6. Select, Remove Unwanted Traits, and Refine
You can select the plant phenotype that best reflects your goals from your first-generation grow. Through phenotype selection, get rid of plants with a weak structure, undesirable aromas, poor yields, or mold/mildew growth.
To further refine and stabilize your strain, repeat the process over several generations:
- Use the best F1 plants to produce F2 seeds
- Grow out those F2 seeds
- Select and breed again to produce F3, and so on
Each new generation gives you the chance to hone in on the traits you want in your new strain and weed out the ones you don’t.
7. Stabilize Your New Strain
Proper stabilization of cannabis genetics happens over time. The goal is to get your desired traits to consistently appear in every plant grown from seed. This means selecting and inbreeding the best phenotypes for more than one generation.
By the F2 or F3 generation, you may start to see more consistency in your plants, but true stabilization, where the majority of offspring reliably express your desired traits, can take several more generations. This will depend on factors like genetic variability and how selective you are with your breeding.
8. Test and Cultivate Your Final Strain
Once you have a stabilized strain, it’s time to test it. Growing the strain in different environments is recommended to ensure the genetics hold up in different conditions. Try growing your strain in indoor and outdoor setups, various climates, soil vs. hydroponic systems, or using different lighting conditions. This will help you determine how resilient and stable the genetics of the strain are.
To help check consistency among the cannabinoid and terpene percentages, have your product tested in a lab using the same method each time. This will help give you accurate data on THC and CBD contents, along with terpene expression. Getting feedback on aroma, flavor, and effect from trusted growers and consumers is also recommended.
During this step, consistency is key. Your new cannabis strain should deliver the same effects and characteristics every time it’s grown.
9. Name and Document Your Strain
The final step in the breeding process is to pick a memorable name that reflects your unique strain’s effects, aroma, flavor, or genetic lineage.
In a grow journal, document everything about your marijuana strain. Include the parent strains, breeding process, grow data like yield, terpene, and cannabinoid profiles, and any cultivation tips. This documentation will add credibility and transparency if you plan to share or sell your seeds.
How Long Does It Take To Make Your Own Weed Strain?

Dutch Passion
Breeding a new cannabis strain is an extremely time-intensive process. Stabilizing a strain to express desired traits consistently can take several generations, depending on the number of breeding cycles and the specific goals. Faster methods exist but may sacrifice consistency and quality.
Seeds are best made indoors for more environmental control and better ability to establish stability. It can take up to a year to create stable genetics if breeding indoors, but if you take your breeding project outdoors, it can take 2 to 3 years because of the seasons.
For those interested in creative and resourceful ways to consume their new weed strain, check out 10 Household Items For Smoking Cannabis.
Avoid These Common Strain Breeding Mistakes

Dutch Passion
- Lack of Clear Goals: Without defined objectives, efforts to breed your own cannabis strain can become unproductive and without purpose. Know exactly which parent plant traits you want to enhance.
- Poor Parent Selection: Using unstable or unhealthy genetics will often lead to inconsistent or weak offspring.
- Skipping Documentation: Without proper record keeping, tracking lineage, genetic variation, and results becomes impossible. This makes it all the more difficult to replicate any success or avoid repeated failures.
- Rushing Stabilization: Don’t stop at F1. One round of seeds isn’t enough, and stabilization in breeding often takes several generations. Cutting corners can quickly lead to unreliable strains with inconsistent traits.
Herb Recommended Products:
READ MORE