Spliffigami: How To Roll A Squid Joint
You have seen these amazing cannabis creations all over the net, now it is time to test your skills and learn how to roll your very own Squid Joint.
You have seen pictures of these amazing cannabis creations all over the net, now it is time to test your skills and learn how to roll your very own Squid Joint thanks to WeedTV.
Start with a lot of papers
The majority of this creation will take RAW Rolling Papers. Take 4 papers and stick them together, overlapped at an angle so one short side is half way up the short side of the next, while the other side barely overlaps the corner of the other short side. This will create a piece of rolling paper that can be rolled into a cone with a narrow opening on one end, and a larger one on the other.
Before rolling, cut and remove the parts of each paper that overlap and remain loose on the paper next to it.
After rolling and sealing, ensuring the cone is smooth and well made, take another paper and roll a tube to fit around the narrow opening, creating a cone that opens in the opposite direction. This might take more than 1 paper. Roll so the glue is around the cone. Seal together.
Repeat this with another paper, making a second ring around the first roll that goes even further from the first cone. Ensure it opens the roll further into a second cone. Seal. Alternately flattening and then shaping the entire piece back out can help with pressing the glue down and ensuring a good seal.
The body begins to take shape
Cut a slit in the paper on the second ring of the second cone, and fold the second ring down over the first, like the collar on a dress shirt, then unfold, so the collar stands up wide apart, flaring the second cone.
Now you will repeat the first step, making a separate cone from 4 papers and removing the excess paper. Overlap it so the one short side touches the far corner of the paper behind it, instead of halfway up like the first cone. This will make a cone with a steeper angle to it, that should sit nicely atop the wide opening of the first cone and overhang slightly like a roof.
You can trim a little length off the first cone to achieve this overlap.
Time to break out the herb
You will take the last cone you made, close the narrow end, and begin to load it with finely ground herb. Pack it periodically as you fill it for sturdiness. Do not load it past the point the other cone fits inside it. Set aside.
Take the main body, and hold the flared end closed at the first paper ring, and pack the first cone to within a quarter inch from the top. Test fit the two pieces together and remove any excess paper from this cone so the bud packs meet smoothly inside without bunching the paper.
You will seal these two halves together by cutting the glue strips off a few other papers and wrapping them around the “roof overlap”, tightening it around the half inside of it. It will take several glue strips to seal this off completely, wrapping lower each time.
Preparing for the tentacles
Now that the main body is ready to go, you will flare open the “collar” section of the bottom of the squid, and begin rolling some more standard joints for the tentacles. Measure the thickness as you roll so they aren’t too thick, and all are even. Then push them gently into the body, making sure the ends that go inside are packed to the end, and wide open. You can also use a hard straw to push a path for them into the herb inside the body.
Now you will cut the glue strips off several more papers, and begin sealing the body to the tentacles. You can do this by cutting slits in the “collar” to help wrap it around each joint, and then use the strips to seal it closed. Or you can simply repeat the procedure from the first seal, and go around the outer edge.
Final touches
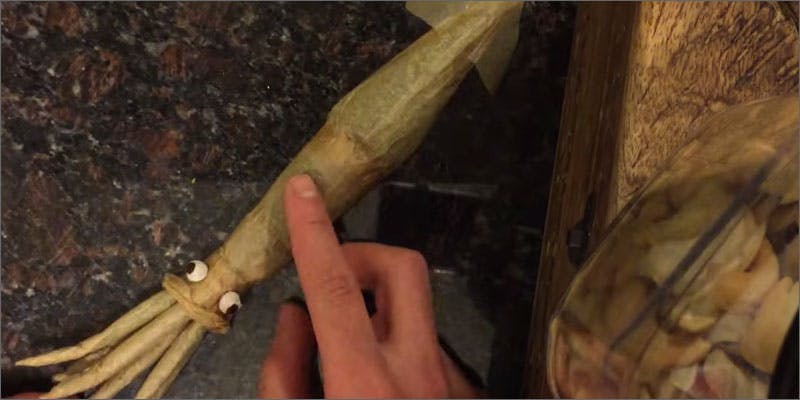
To finish off the piece, you will add the distinctive “shovel head” flare of a squid to the top of the piece with two ear shapes cut from some other papers, with the glue to attach to the top. Then, you can roll a mini joint with white paper, snap its ends off, and pierce two holes into the area just above the tentacles. Close the open ends of the two nubs with a glue strip from your brown papers. Push these nubs into the holes, and they will appear to be white eyeballs with Raw paper brown-colored eyes.
Squid joint victory
Congratulations! If you have had the tenacity, the stack of rolling papers, and enough bud to complete this epic spliffigami, you can be proud of your achievement. If you need a more visual learning experience, you can watch the video below, but you will want to slow down the time-lapse and go through it a couple times to catch everything. Combine that with the detailed instructions above and you are sure to conquer this Tentacled Titan!
Have you been able to conquer a complex joint creation like the squid joint yet? Show us your creations! Share with us on social media or in the comments below.
Featured Brands:

Herb Recommended Products:
READ MORE


